What Does a Property Inspector Do?

Choosing the right place when buying property can provide satisfaction. It involves considering certain factors beyond just the piece of land itself. One of the key things to focus on is gaining a complete understanding of the property’s zoning.

The property inspection serves the fundamental purpose of identifying any minor or major issues in the property. Likewise, the seller permits the buyer to inspect the property before the closing date. To accomplish this, astute buyers enlist the services of property inspectors, who report any issues in the property to facilitate further negotiations between the buyer and seller.

What is a Property Inspection?

A property inspection is a process of examining a property to evaluate its condition and identify any potential issues or defects. The inspection is typically conducted by a qualified professional, such as a licensed home inspector or a building inspector, and is often performed before the purchase or sale of a property.

If you are renting, owning, or considering investing in real estate, you should be aware that property inspections are a common aspect of the real estate industry. Both residential and commercial properties undergo property inspections, which can impact the value of your property investment.

Therefore, it is crucial to comprehend the significance of property inspections. Keep reading to explore the various types of property inspections, their objectives, and ways to get ready for them.

Who Performs Property Inspections?

Property inspections are typically performed by a professional property inspector who looks for malfunctions, any needed repairs, and other issues that are required to be fixed.

What Does a Property Inspector Do?

A property inspector undergoes training to conduct a thorough evaluation of a home and all its components. They produce a detailed report for the buyer or seller that offers valuable information about the present state of the home, including the condition and age of expensive structures such as the roof, HVAC, and electrical systems.

Home inspections assure buyers that they’re making a sound investment decision, while sellers can use the information to determine necessary repairs before entering negotiations with buyers. A property inspector strives to provide accurate and objective assessments of properties. They do not have a personal stake in the property’s sale, nor do have any vested interest in the outcome of the inspection.

Their goal is to provide an impartial evaluation of the property’s condition and offer advice to help property owners or potential buyers make informed decisions.

Types of Property Inspections that Property Inspectors Provide

Property inspectors perform various types of inspections to assess the condition of a property. Some of the common types of property inspections are:

General Home Inspection: This is a comprehensive inspection that covers all aspects of a property, including its structural integrity, plumbing, electrical, and heating systems, roofing, and ventilation.

Pre-Purchase Inspection: This type of inspection is usually performed before buying a property to identify any defects or issues that could affect its value or safety.

Pest Inspection: A pest inspection is conducted to identify any pest infestations, such as termites, rodents, or bedbugs, that could cause damage to the property.

Radon Inspection: This inspection is carried out to detect the presence of radon gas in a property, which is a radioactive gas that can cause lung cancer.

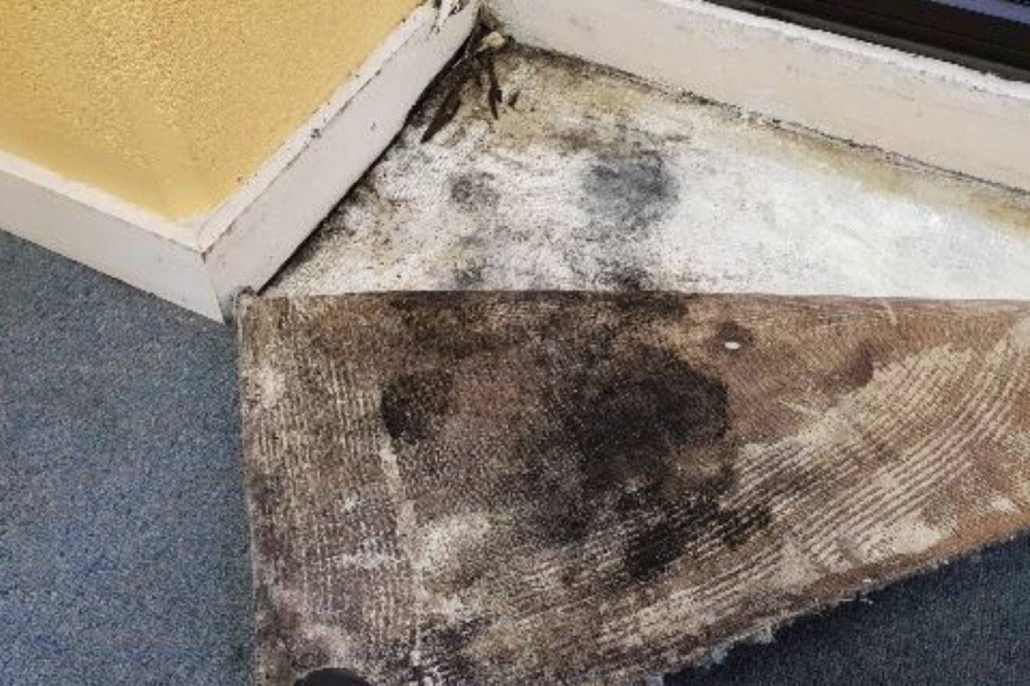
Mold Inspection: This inspection is conducted to identify any mold growth in a property, which can cause health problems and structural damage.

Lead-Based Paint Inspection: This inspection is conducted to determine if lead-based paint is present on the property, which can be a health hazard, particularly to children.

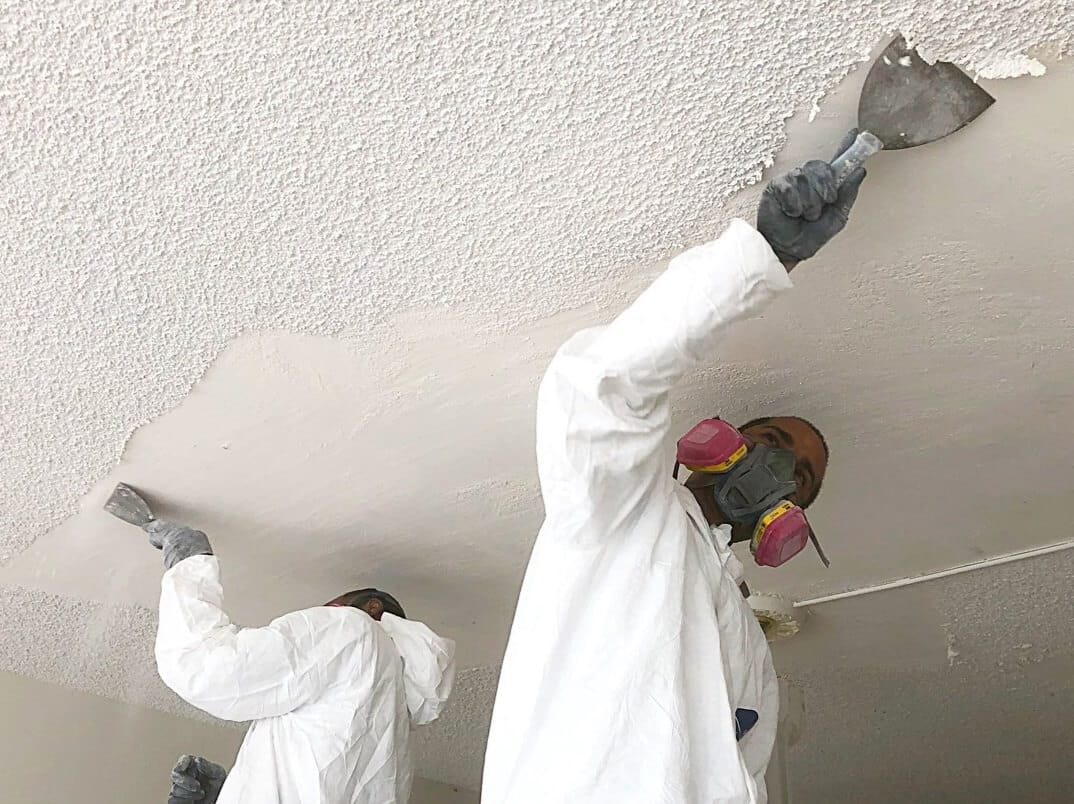
Asbestos Inspection: This inspection is carried out to identify any asbestos-containing materials in a property, which can be a health hazard when disturbed.

Why is it Important to Choose the Right Property Inspectors?

When you are getting your property inspected, it is important to choose the right property inspector. A right property inspector not only provides you with a detailed report of your property it also brings in peace of mind.

Choosing the right property inspector is important for several reasons:

Identifying Potential Issues: A property inspector can identify potential issues in a property that may not be apparent to the untrained eye. This includes problems with the foundation, electrical wiring, plumbing, and other important systems.

Saving money: By identifying potential issues, a property inspector can save you money in the long run. They can help you negotiate a lower purchase price or identify issues that need to be addressed before you close on the property.

Ensuring safety: Safety is a top priority when it comes to real estate. A property inspector can identify potential safety hazards such as mold, asbestos, or faulty electrical wiring, helping you make informed decisions about your purchase.

Peace of mind: A thorough inspection can give you peace of mind knowing that you are making an informed decision about your investment. You’ll have a better understanding of the property’s condition and any potential issues that may arise.

When Do You Need to Hire a Property Inspector?

A property inspector inspects your property and lets you know about the repairs and measures you need to take for your property. You may need to hire a property inspector in various situations such as;

  • Home buying
  • Home selling
  • Regular maintenance
  • Insurance purposes

Advantages of Property Inspections

Plan seamlessly with timely residential property inspections. Property owners who hire inspectors gain insight into the property’s appearance and can plan furniture placement and decor ahead of time, making necessary arrangements such as funding.

Professional assistance provides far-sightedness for confident investment in a lifetime property. Regular inspections ensure the property remains in good condition, avoiding costly repairs. Annual inspections help to identify potential threats like plumbing, roofing, foundation, structural issues, and pest infestations, which can save time and resources in the long run.

Conclusion

In conclusion, property inspectors play a crucial role in the home buying and selling process. Their job is to provide a comprehensive evaluation of a property’s condition and identify any potential issues that may affect its value, safety, or livability. By conducting thorough inspections and preparing detailed reports, property inspectors help property owners and buyers make informed decisions about their investment.

How to Fix Cracked Slab Foundation?

Your home can have structural issues due to a significant problem with your slab foundation. Your home’s foundation is crucial; therefore, any damage must be repaired immediately. We will discuss why a slab foundation could crack in this post and the remedies.

What Causes a Cracked Slab Foundation?

Concrete placed directly onto the ground is known as a slab foundation. Those with mild to moderate climates frequently use this kind of foundation. Nevertheless, a slab foundation can break for a variety of reasons, including:

· Soil Movement

The soil underneath the foundation can move or shift for various reasons, such as changes in moisture content, earthquakes, soil consolidation, and freeze-thaw cycles. When the soil moves or shifts, it can cause the foundation to crack.

· Poor Drainage

Poor drainage around the foundation can lead to water collecting and causing the soil to expand, which can also lead to cracks. If an insufficient slope away from the foundation or the drainage system is inadequate, the ground may become waterlogged, leading to foundation cracking.

· Excessive Weight

If there is too much weight on the slab, it can cause the foundation to crack. Heavy objects, such as large appliances or furniture, can place uneven pressure on the foundation and cause it to break. Traffic from heavy machinery or vehicles can also cause the foundation to crack.

· Temperature Changes to Repair Slab Foundation

Extreme temperature variations can cause the concrete to expand and compress, which might result in foundation fractures. It is common during hot summers and freezing winters when there might be big swings in temperature. This expansion and contraction over time may result in the foundation cracking.

Signs of a Cracked Slab Foundation

It’s essential to be aware of the signs of a cracked slab foundation so that you can address the issue as soon as possible. Some common symptoms of a cracked slab foundation include:

  1. Damages in the walls, floors, or ceilings
  2. Uneven floors or walls
  3. Doors or windows that stick or don’t close exactly
  4. Cracks between the walls and ceiling or floor
  5. Sloping floors

You must call a professional to inspect your foundation if you notice any of these signs.

Steps to Fix a Cracked Slab Foundation

If you have a cracked slab foundation, it’s essential to take steps to repair the damage and prevent further problems. Here are some steps you can take to fix a cracked slab foundation:

1.   Determine the Cause of the Cracks

Before you begin repairs, it’s essential to identify what caused the foundation to crack in the first place. If you don’t address the underlying issue, the cracks may reappear in the future. Common causes of foundation cracks include soil movement, poor drainage, excessive weight, and temperature changes.

2.   Prepare the Area to Repair Slab Foundation

To prepare the area for repair, you must clean the slab’s surface and remove debris. If the crack is extensive, you may need to use a chisel or other tool to widen the attempt to create a V-shaped channel. It will help the repair material adhere better to the surface.

3.   Repair the Cracks

Depending on the extent of the damage and the size of the cracks, there are a few different alternatives for foundation repair. You may use a concrete patching product to smooth out the surface and fill up smaller gaps. You should patch more significant cracks with epoxy and fortify the surrounding region using an injection method.

4.   Reinforce the Slab

It’s crucial to strengthen the slab to stop further cracks. Before pouring a fresh layer of concrete over the slab, steel reinforcing bars, or rebar, can be installed. To strengthen the concrete, you may also add wire or fiber mesh. These materials help distribute weight and stress more evenly, reducing the risk of future cracks.

Prevention Tips for a Cracked Slab Foundation

Preventing a cracked slab foundation is much easier than fixing it after the damage has already occurred. Here are some prevention tips to help you avoid foundation cracks:

· Proper Drainage

Poor drainage is a common cause of foundation cracks. To prevent this, ensure water is adequately directed away from the foundation. Gutters and downspouts should be clear and functional, and the ground around the foundation should slope away from the house.

· Avoid Excessive Weight

Excessive weight on the foundation can cause it to crack over time. Avoid parking heavy vehicles on the slab, and be mindful of the importance of any large appliances or furniture that you place on the foundation.

· Regular Maintenance to Repair Slab Foundation

Regular maintenance can help you catch small cracks before they become more significant problems. Inspect the foundation regularly, and watch for any signs of damage or shifting.

· Proper Soil Preparation

The soil must be appropriately prepared for your foundation to last a long time. Make sure the earth is firm and compacted before pouring the concrete. Over time, the shifting and unstable world may cause the foundation to break.

· Use High-Quality Materials

Using top-notch materials can assist assure the durability of your foundation. Make sure the contractor you choose uses high-quality reinforcement and concrete.

Conclusion

Careful planning, preparation, and performance are necessary when repairing a broken slab foundation. Finding the fracture’s origin and taking the required precautions to prevent future damage is essential. Fixing a damaged slab foundation might be simple if done correctly, regardless of whether you want to do it yourself or hire a professional to repair slab foundation.

How To Get Rid of Black Mold in Attic?

Mold plays a significant part in the natural decay of dead biological substances. Mold grows by producing microscopic, visually undetectable spores. These airborne spores can enter a home through any opening, including windows, doors, or cracks in the walls.

Molds play a crucial role in the recycling of organic waste and may be found throughout nature, even in your attic. Mold can develop if there is a moist or wet area where the spores can start to grow.

Everything that mold needs to develop is present in attics, including food, oxygen, the correct temperature, and moisture.

Regrettably, when present within a home, mold can harm one’s health. How to get rid of it? Let’s look at the causes of mold growth in attics, how to spot it, how to remove it, and when to call an expert for mold removal in the attic.

Black Mold

How Does the Mold Development Usually Appear?

Either a flat, low-profile structure of mold growth or a fuzzy, three-dimensional pattern appears on the sheathing. The low-profile, flat growth frequently resembles soot or stains. A mold growth may occasionally be mistaken for fire soot by a house inspection.

This particular mold growth won’t smear or wash away. Long after the mold has ceased growing, the area will continue to be darkly discolored.

Attic mold with fuzzy growth is less frequent and often simpler to remove. It is possible to apply a thinner coating of encapsulant since the staining is minimal.

Causes Of Mold in Attic

Attics frequently contain fungi, particularly black mold, for a variety of reasons. As your attic is part of your home that is closest to the roof, any moisture will wind up there and cause black or white mold. Yet, many various problems might lead to a property having a black mold infestation.

Poorly Ventilated Attics – Mold in Attic Removal

The most frequent cause of black mold in attics in regions with cold temperatures is inadequate attic ventilation. Attic ventilation that is improperly planned might also be an issue. Some attic ventilation systems are made with a mix of vents that catch and form pockets of “dead air,” which is produced when condensation forms on the roof decking during cold weather.

Inappropriate Discharge

Sadly, several home designs situate exhaust fans from the dryer, kitchen, bathroom, and other locations where they release their discharge into the attic rather than the exterior of the house. This may produce the ideal environment for black mold removal in the attic.

Condensation From the Water Heater and Furnace

Instead of being installed in an enclosed space, a furnace and/or water heater can produce enough heat to cause condensation in cold climates and support the growth of mold if they are installed in an attic with inadequate ventilation.

How Quickly Do Molds Expand?

Molds can start to develop in less than 48 hours if there is enough moisture. A mold time bomb can appear from water from leaks, condensation, and inadequate ventilation.

How To Get Rid of Mold in Attic?

If the mold in your house is less than 10 square feet (around a 3×3 space), you may clear it, according to the EPA. To be safe, you should dress in long sleeve shirts and pants, gloves, goggles, an N95 mask, and other protective clothes and accessories.

Empty And Seal the Attic – Mold in Attic Removal

Make sure the attic is free of anything. To transport items outside, pack them in heavy bags and seal them tightly. Examine the rafter and insulation. Insulation that has been impacted by mold should be removed and replaced following restoration.

Plastic sheeting should be used to seal vents, windows, and other openings. You may start by drying the mold once you have sealed the attic openings. Spores or fungi are often distributed by active mold. The spores are neutralized by drying them.

Apply a Removal Solution/Mixture & Scrub It

In a spray bottle, combine a mold-eradication solution. You can make a bleach solution (1 part bleach to 10 parts water) or use a mold-cleaning product. For the right dilution rate, be careful to adhere to the manufacturer’s directions on the label.

Spray the mold-removal solution on the plywood’s mold-infected spots. Be careful to fully wet the moldy areas. To destroy the mold spores, let the solution rest on the mold for at least 15 minutes.

Scrub the moldy plywood with a scrub brush to get rid of the mold. To get rid of the mold, scrub in a circular motion while exerting strong pressure. To stop the mo

ld from transferring to other locations, periodically rinse the brush with the mold removal solution.

Wipe it Off with a Damp Cloth – Mold Removal in the Attic

Be careful to wipe with a damp cloth. Airborne spores might reappear in different places and encourage the growth of further mold by dry wiping. Even though a surface seems to be clean, it may still contain mold spores since they cannot be seen with the human eye.

Hire A Professional for Mold Removal

Having a professional mold removal inspector in your area is the only way to obtain a precise estimate. If you decide to move forward with the service, several mold remediation professionals in the region are pleased to offer a free quote.

Yet the high level of work required is what drives up these prices.

Professional Remediation Service Cost

Black mold damage, attic sizes, and architectural intricacy all vary. The average price per square foot for attic fungal removal and cleanup treatments is between $10 and $25.

The majority of specialists will assess the extent of the fungal growth and attic damage before estimating the cost of cleanup because it wouldn’t be fair to charge just on area size.

If you exclude any roof repairs, the total cost for mold removal in the attic might range from roughly $1000 to $4000.

How to Become a Certified Mold Inspector?

A formal exam must be passed by completing a certification course to become a Certified Mold Inspector. Although it is optional to have any official training to enroll in this course, a basic understanding of how homes and structures are made would be helpful.

Who is Certified Mold Inspector?

A Certified Mold Inspector has received specialized training to understand the wide varieties and their underlying causes. They have been taught to identify the moisture source that led to the mold’s creation and provide expert judgment on the mold’s settlement.

The certified mold remediator can test the air and pertinent surfaces in the property to determine the severity of the issue, regardless of humidity or poor drainage.

Describing the Causes

Mold inspectors can better understand the presence of mold due to mold remediation training. Unfortunately, before pollution becomes apparent, homeowners can have been exposed to it for months. It could have already started to rust the building from the outside by this point.

A thermo-hygrometer is one piece of specialized equipment that mold inspectors will use to demonstrate the environmental factors in the property that contributed to the mold.

Mold inspectors examine areas where you would only sometimes search for mold. They search behind walls, behind appliances, within tubes in the flooring or ceiling, and under plumbing fixtures. Because of their work, you could have a higher chance of getting rid of the infestation before it gets out of hand and spreads to other parts of your building.

Crucial Steps for Certified Mold Inspector

Some essential steps for a certified mold inspector are listed below:

Find out the Mold Inspection Laws in your State

To become a certified mold inspector, you must first be familiar with your state’s mold inspection and cleanup laws. Currently, the majority of states do not require a license to be a mold inspector. However, several states are exploring new rules or already have legislation that can soon govern the practice of mold specialists.

Additionally, many homeowners, homebuyers, lenders, and insurance firms prefer to work with certified mold specialists that are familiar with and adhere to the national standards for mold inspection and cleanup.

Even though your state doesn’t now need licensure for mold inspection, this is a beautiful opportunity to get certified in mold inspection just in case it does. Additionally, this certification can reassure potential clients that you can spot mold problems.

Finish a Certification for Mold Inspection

Mold inspectors must thoroughly know how to identify mold in a property, conduct air and surface samples for mold testing, and identify moisture problems that can eventually result in mold damage.

Also, mold inspectors should be able to provide consumers with sound advice on mold removal; sometimes, this suggests a licensed mold remediation expert addresses a present issue, and other times it entails making appropriate suggestions to avert a problem in the future.

When you enroll in a mold certification course, you’ll gain these abilities and more. When searching for programs, remember that your state could have specific mold inspection standards that the programs must adhere to.

Choose Whether or not You Want to Get Certified Mold Inspections

Mold inspectors visually examine and test a home for mold issues. Certified mold remediation experts, also known as mold abatement professionals, safely remove health risks associated with mold from a property. Many competent mold inspectors take it further and get certified in mold removal.

This allows you to provide all-inclusive mold inspection and cleanup services, which is advantageous for your clients. In contrast to mold inspection, most states mandate certification in mold remediation to provide these services lawfully. Make careful to research the laws in your state.

To properly remove mold and put measures in place to avoid it in the future, you will need to finish perfect mold remediation training if you want to choose this course of action.

Buy Mold Inspection Tools & Personal Protective Equipment

A home’s interior mold development confuses a significant risk to respiratory health. Wearing protective gear is crucial to keeping yourself safe when inspecting a mold. When entering houses with mold damage, inspectors and remediators frequently wear N-95 respirators, eye protection, waterproof shoes, gloves, and protective clothes.

You should also spend money on typical mold inspection instruments and essential PPE. These consist of the following:

  • Particle Scanner
  • Moisture Meter
  • Infrared camera
  • Borescope
  • High-Powered Flashlight
  • Hygro-thermometer
  • Air Sampling Pump

Locate a Reputable Laboratory to Examine Mold Testing Samples

Mold inspectors frequently connect with recognized testing labs to which they send air and surface mold samples for inspection. Although there are numerous options for testing laboratories, it is better to pick one certified to test for mold.

When selecting a lab, you can also consider the price of sample analysis, the typical turnaround time, and the procedure for sending samples in for testing. Many mold inspectors include the cost of their lab tests in the price of their mold inspections.

How to Get Rid of Black Mold on Carpet?

Understanding why black mold grows on your clothes is crucial before knowing how to remove it. As long as there is moisture, mold can develop on practically any surface or material in your home. Nutrients, light, and temperature are some more critical elements for the formation of black mold.

It’s usual for germs to exist because carpet fiber can absorb moisture like a sponge. Another factor is the accumulation of dust in high-traffic areas, which gives mold enough nutrition to survive and thrive.

Steps to Remove Mold from Carpet – Best Mold Removal

You should put on protective gear before beginning the mold removal and disinfection of the area to keep yourself safe. To decrease the chance of breathing in mildew spores, it is crucial to use a medium or high-efficiency filter dust mask. Your clean-up attire should cover your entire body and be simple to take off and clean.

When removing mold from carpets, protective gloves and safety glasses are advised. After using these things in a fungus-infested environment, kindly dispose of them.

Step 01:

The first step is to dampen the afflicted area gently. As a result, it will be more challenging for the mildew spores to spread during the cleaning procedure.

Step 02:

Lift the carpet to check the padding and subflooring if you’re removing mold beneath it. Replace the padding if it is moldy and throw it away. Apply soapy water to the area and scrub it with a stiff brush. Once the mold material has been removed, clean the surface very well. The flooring beneath the carpet should be washed with a soapy water solution the same way as the carpet.

Step 03:

After that, clean the moldy area using a solution of 10 parts water to 1 part household bleach. Because household bleach is fungicidal, it will destroy mold. Rinse the afflicted area with hot water thoroughly after disinfection.

Step 04:

With paper towels, soak up as much rinse water as possible before allowing the surface to dry. The area can need two or three days to dry completely. A dehumidifier can be used to improve the drying process. Vacuum the carpets in the affected area after the area has dried, it makes the whole process of best mold removal quite complicated.

Another Way to Clean Mold from Carpet

As we explore three natural methods, remember that they can or cannot be the best depending on your carpet and mold issue. There are natural ways to remove and clean black mold from carpets, and they can be beneficial if you wish to avoid chemicals.

· Baking Soda for Best Mold Removal

Since baking soda is non-toxic, this is a fantastic choice if you have kids or pets. It will deodorize the carpet in addition to resolving the problem. Combine baking soda and water to thoroughly soak the carpet and get to all the mold’s origins. Per water spray bottle, a tablespoon is a typical measurement. After using a brush, spray the area.

You can regularly use baking soda on the carpet to prevent problems because it is harmless, whether diluted or powdered.

· Hydrogen Peroxide

This is not a suitable method to eliminate black mold on carpets. This is so that various materials can be bleached with peroxide. This can be a wise choice if you work with white or light carpets. Spray peroxide into a spray bottle until the moldy area is completely saturated. After 10 to 15 minutes, clean the carpet with a brush before scrubbing with a towel.

· Vinegar

If you are unsure of the mold you have, vinegar is an excellent substance because it kills the great majority of species, including black mold. Soak the material thoroughly so that even the underlayer is covered. After an hour, wipe with a cloth after allowing the vinegar to rest.

Signs of Mold on Carpet

Your carpet can smell foul due to fungi. When it happens, though, leaving them unattended can make matters worse. The first thing to remember is that you should be alert if black mold on the carpet begins to form or starts to spread quickly. Here’s how to recognize when something awful is going to occur:

1. Moldy Carpet

Some people maintain their old carpet for years because they claim it is their favorite and is cozy. However, when put below grade level, old carpet has the most significant risk of being exposed to black mold. People can mistakenly believe that a moldy carpet’s rusty odor is typical when they haven’t used it for a while.

Sadly, that can be a warning that black mold is developing on the carpet.

2. Bad Smell

You should anticipate a foul odor everywhere if black mold grows on the carpet. Unfortunately, some individuals can assume that the mold is not there and that it is simply a typical damp issue due to the ruined baby food or even the rubbish outdoors. Check under and on the carpet for potential suspects to be sure.

Look for a musty smell on the wall covering and raise it to check for mold development on the underside.

3. Damp Carpet

Cleaning mold from the carpet as soon as your child spills their bottle on it is crucial. A carpet has a significant chance of developing black mold if it is moist or wet for more than 24 hours. Some of you can believe that after wiping the liquid away, the carpet would begin to dry on its own.

Unfortunately, the carpet will have black mold; therefore, it’s best to send it to the local laundromat so it can be washed and properly dried.

4. Carpet Discoloration

The quickest approach to determine whether black mold has spread to the carpet in an advanced stage is to check for surface discoloration. When a mold colony is present in significant numbers, discolored areas might first appear in varying colors of green or black. Before the stain appears on the carpet’s surface, it can develop beneath it.

Due diligence should be done on both parties as a result.

5. Bad Allergies

When you suddenly get severe allergies that you have never had before, this might be a hint that you have black mold on your carpet. Your body will respond to the allergens produced by the mold by having severe breathing difficulties. Checking for black mold on a carpet or beneath its surface is never a bad idea, even though allergies aren’t always the result.

Reasons Why Mold Occurs on Carpet

Some important reasons are listed below:

· High Levels of Humidity – Best Mold Removal

Mold can grow in damp areas of your house or where moisture is always present. When the humidity is high, the air’s moisture content is likely to be high. On hot, humid days, the air can seem heavy or thick. Condensation happens when warm, moist air comes into contact with a surface colder than the air around it.

The carpet can hold onto moisture for a very long period, resulting in the wet conditions necessary for mold growth.

· Unchecked Water Damage

Water can seriously harm a house since it tampers with its appearance, aroma, and structural integrity, mainly if it is constructed of wood. Because carpets can collect more water from your walls or the subfloor, they are more prone to damage. Sometimes it takes smelling a musty stench or seeing mold before you realize there is an issue.

· Poor Ventilation

If your home is not correctly aired, mold will likely develop on your carpet. In the winter, this generally occurs when many people leave their doors and windows closed for a very long time. Mold spores can land on carpets and other surfaces in a home with poor ventilation, where they can quickly begin to grow.

If your property has a water problem, things might get worse since the excess moisture it produces encourages mold development.

· Accidental Liquid Spills

You can accidentally spill water or other beverages on your carpet, which soaks into the fibers before you have a chance to clean it up. Even after several liquid spills on the carpet, some homeowners can take this seriously and air out their carpets to dry. Other homeowners, however, can choose to disregard the issue.

After a few days of exposure to a moist and humid environment, the dependencies of mold can begin to form. It often develops and multiplies quickly when action is made to successfully address the issue by reducing the source of moisture.

· Poor Home Maintenance

Mold can develop on carpets because of dusty surfaces, inadequate window seals, leaky roofs, and plumbing problems since they foster an atmosphere favorable to their development. If you don’t frequently vacuum your floors and carpet, moisture from the air is absorbed by the collected dust, which promotes the growth and rapid spread of mold on the carpet.

Poor home upkeep creates the ideal environment for mold spores to establish a foothold and infest your entire house.

Due to Mold, Different Diseases That Occur on Carpet

Important diseases that are dangerous for human health are listed below:

Asthma Attacks

Dirty carpets decrease asthma risk increases and indoor air quality. They can cause additional major respiratory problems that are scary and draining if not treated appropriately. Carpets are surprisingly unclean and harmful, and moist carpets are much worse since they serve as breeding grounds for allergens that cause asthma, such as dust mites and black mold.

Skin Irritation

Mold spores can spread throughout the rooms by being disturbed and supported by the ruffling of moldy carpets. Your skin can develop eczema and hives when mold spores come into touch with it.

Allergies – Best Mold Removal

Since dirty carpets shield germs, fungus, and dead skin cells, dust touches thrive there. These teasing, tiny creatures can make it difficult for humans to go about their regular lives by causing allergies and irritants. These mites can cause swelling, skin rashes, itching, stuffy noses, sneezing, and other discomforts.

They are deadly, both living and dead. Read out this article to clear out your concerns regarding the best mold removal.

How To Choose the Best Mold Removal Company?

The majority of fungus and fungal-like parasites, particularly those found in homes or other types of buildings, are commonly referred to as mold. These mold eat both dead and living things to survive. Mold can create health issues that manifest as allergic responses, such as sneezing, skin rashes, asthma attacks, and respiratory infections when it develops inside.

Although we are aware that mold and humidity are an aspect of life, this does not lessen how uncomfortable the situation is. In addition to dealing with a mold issue, you also need to choose the best mold removal company, which may seem intimidating for any mold removal company.

It is vital to take into account the finest firm while searching for a mold removal service to make sure you receive the proper mold removal method. Making the right pick, however, may be challenging and perplexing given the market’s abundance of options. This blog will tell you all you need to pick a mold removal company to assist you in restoring your house.

Do Research About Mold Removal Company

Investigating several mold clean-up companies is the first step. Get recommendations from trusted sources first. then take a look at a few of the reviews posted on the business’ website. These kinds of searches are simple to trick. Never assume that the business that is nearest to you is any better than the business in the town over.

It is improbable that you will “happen” upon the finest in each situation. You want a mold removal company that stands behind the work it produces. Finding them will need some investigation.

Experience for Home Mold Removal Company

Experience and how long a firm has been using the same procedure are the two most important factors in mold eradication. The more similar instances the firm has handled to yours, the better; experience should be your top factor when selecting the finest organization.

Before making any decisions on picking or hiring, take your time and attempt to compare several firms based on how long they have been in business. The finest mold removal company to employ is one with at least 10 years of experience and a long list of successful and full processes as mentioned by any well-reputed best mols removal company.

Affordability

The price of a mold removal company might vary greatly. It is crucial that the business you select can provide you with a definite price and outline the extent of the job.

Future Prevention of Mold Growth

There are specific steps and advice you can take to control the substantial growth of mold, and professional mold removers do not just know how to clean mold—they also know how to stop it from happening again, or at the very least, contain it to ensure that it does not cause as much damage as it did the first time.

Qualifications

You could not get the best mold clean-up services that you will need and deserve if you lack the necessary credentials. Before hiring a firm and providing them access to your building or house, be sure they meet all of these standards.

Ask The Right Questions 

Any trustworthy business will welcome inquiries regarding its offerings. The degree to which they are open to discussing their areas of expertise will reveal how serious they are about completing the task safely and effectively. Here are a few queries you should ask the mold removal companies on your shortlist:

Is liability insurance carried by you? A respectable mold removal company should be willing and able to present proof of insurance that demonstrates that they have enough active liability coverage.

What credentials do you possess? It’s critical to ascertain whether they are licensed and certified appropriately for mold testing, risk assessment, and mold eradication.

To guarantee nothing is left behind and to offer you peace of mind, a business that takes pride in and is confident in its mold removals will check the air quality on the spot once the job is finished.

Certification – Best Mold Removal Company

When searching for a mold remediation business, you should also take this into account. For instance, the insurance policy and license are only a couple of the paperwork that a mold removal business should own. Ideally, the license is significant since it demonstrates the legitimacy of the business you are employing to offer the services.

Select A Local Business

The location of the mold clean-up service is something else to take into account. Selecting a local business might be advantageous because they are more likely to comprehend your location and the weather patterns that can promote the growth of mold.

Liability Insurance – Best Mold Removal Company

The business you choose to engage with must be insured by liability insurance and also that their policy is specific about covering mold work. They do not have the appropriate coverage if they are not provided with this in writing.

Before and After Remediation Test

Testing should be done by the mold removal company you choose both before and after clean-up. To fairly judge the results once the task is over, you must understand how awful things were before the effort. Ideally, a different business should do the tests following.

Find out more about the testing processes used by the mold removal company you want to hire. For the after-testing to be unbiased, they ought to advise utilizing the best mold removal company.

When To Call a Mold Remediation Specialist?

Finding mould in your home is upsetting for anybody, but there’s no need to freak out. A significant mould invasion that goes untreated may cost tens of thousands of dollars to clear up. It may also create a negative impression of your property that will tarnish its resale value for years to come.

Are you still unsure of when you should contact a mould remediation expert and when you should attempt to remove the mould yourself? It is up for debate. Here are some simple indications of when you should contact a mould remediation expert, and why you should trust certified mold remediation, removal, inspection, testing, restoration services offered by mold remediation specialists for the process of water remediation.

Significant Water Damage

Moisture is necessary for mould to flourish. Therefore, you must move promptly to locate the cause, make the required repairs, and schedule a mould inspection if you observe water damage in your house. If mould isn’t dealt with right away, it can quickly develop and spread. 24 to 48 hours after water damage, mould can begin to form.

You need to contact a mould remediation expert if your house has water damage from a flood, leak, or another cause. Most mould removal professionals have additional training in water damage restoration and can repair your house after a leak or flooding. Ask about the services and mould removal experts offered by a nearby, trustworthy, and trusted mould remediation specialist.

Health Risks – Process of Mold Remediation

Residents of the home, particularly young children and the elderly run the danger of being ill from breathing in and smelling mould. Mould, which is probably brought on by HIV, some forms of cancer, chemotherapy, malnutrition, and organ transplants, is also harmful to persons with weakened immune systems.

If there are any delays, it is crucial to address the mould issue straight once or temporarily relocate the people who are in danger to another home. Avoid allowing the sad side consequence of mould growth in your house to be health issues.

Growth Of Mold

The pace of growth of black mould is a warning indication. Black mould is an easily contagious, blotchy, black or brownish mould. Since black mould is more likely to trigger allergies in small areas, it’s essential to take action right away if you spot even a little amount of it.

Other types of mould that are forming include pink, blue, and green mould. White mould might be trickier to see on the walls and ceilings.

Musty Odour

You may use your nose to identify musty, damp scents that are a clear sign that a problem is there even if you can’t see any evident mould. Call a mould removal firm right once if the source of the stench is an area that is likely to collect moisture according to some of the mold remediation specialists.

High Humidity

Mould may grow on your building’s surfaces without any moisture present. You may likely experience mould issues if you reside in an area with consistently humid weather for lengthy periods of the year. Mould may be proliferating in the subflooring and within the walls of your home even though you can’t see it due to the high humidity level there.

 Humidity-related atmospheric moisture might also be to blame. Mould development is likely if your building tends to be damp or if your HVAC system isn’t working correctly.

Discolouration Of Paint

A clear indication of water damage is paint deterioration towards the top of the ceiling or in locations with standing water. You might not be able to notice mould growing behind the walls due to this water damage.

Water Leakage

You can get a nasty surprise if you ignore the issue and let your faucet flow nonstop. Mould appears fast and spreads widely. Mould may grow throughout your house and even into your HVAC system as a result of a toilet, leaking faucet, water heater, or plumbing lines.

 Leaks often go undetected, especially if they occur behind walls or other concealed surfaces. Mould may thrive in places where condensation frequently forms. And keep in mind that leaks can occasionally occur where we can’t see them, like behind walls and in ceilings. At this point, mould begins to stealthily spread without our knowledge.

Past Flooding History

It’s important to keep in mind that mould might be a persistent issue if your house has previously flooded. Regardless of whether there is initially no evidence of mould, keep checking places that have previously flooded. Mould may be a problem even after the disaster since moisture can linger for a time.

Size Of Mold – Process of Mold Remediation

The severity of your issue increases with the size of the mould development. Call mould remediation specialists as soon as you see mould growth that covers 10 square feet or more to stop it from spreading further. The mould that spreads quickly can damage drywall and necessitate repair.

You may handle the repairs yourself if the mould growth is less than 10 square feet, but be sure to do your homework and be prepared. No matter how many square feet there are if there is simply too much mould for you to handle effectively, get help from certified mold remediation, removal, inspection, testing, and restoration services offered by mold remediation specialists for prompt and effective assistance.

Air Quality

When the air around you seems chilly and wet, there may be major mould development nearby that has to be cleaned up by experts. In some cases, a dehumidifier might assist you in resolving the current issue. However, since you need a professional to do the comprehensive process of remediation, to figure out what’s wrong and put an appropriate fix in place, this could just be a temporary fix.

Ultimate House Foundation Inspection Checklist

Every year your residence requires a reevaluation of the condition of its foundation. The foundation of any home is the element that is responsible for supporting the structure of the building. So, it is crucial to have some maintenance routines scheduled on a yearly basis so that your residence stays in the best possible condition. Below we have put forward a simple checklist to ensure that your home stays protected with a residential foundation inspection.

1.    Examine the Floors During House Foundation Inspection

Take a close look at your home, starting from the first floor. Pay special attention to any possible signs of cracks, bowing, or sagging. Look for gaps or in other words spacing between walls, floor, and ceiling. You have the option to use a tennis ball or a laser level for a thorough examination of flooring. If the tennis ball starts rolling it shows that the floor is uneven. It is also important to look if the tennis ball’s pace is slow or fast. A fast-rolling rate presents that the foundation is badly damaged.

2.    Doors & Windows Inspection

A wall becomes weak when large gaps or cracks such as the doors or windows are created. These large spaces are normally the initial symptoms of a damaged foundation. Here is what you need to look for:

  • Any possible gaps between doors and windows
  • Cracks that appear and extend in the drywall from corners of doors or windows
  • A window or a door separating an exterior finish
  • Look out for Cracks

3.    Look Out for Cracks – Free Foundation Inspection

Cracks may form over time and some of them could be more significant with time. Below are some factors to look out for while performing a thorough inspection of a home foundation.

  • Diagonal – Appear when a building settles non-uniformly.
  • Hairline – Contemplated as a cosmetic concern and it does not pose a threat to the structural support of any building
  • Vertical – We often come across this when the natural foundation of a building undergoes erosion and leads towards seepage of a basement
  • Horizontal – This one is the most problematic issue of any home’s foundation. These cracks jeopardize the overall structure of a building when found in the middle of lower walls.

4.    Look Out for Mold, Moisture, and Also Poor Drainage

Are the floors of your home slopping or sagging? This may be an indication that moisture has seeped inside the floors. Long-lasting moisture may lead to the growth of bacteria, mold, or other microbes. Some microbes can destroy drywall, and wooden planks or may leave a nasty smell throughout your entire home. Improper drainage can cause water to stand around the foundation of a home. Water creates hydrostatic pressure which produces cracks and holes within the concrete of any foundation.

5.    Damage Caused by Plumbing

Plumbing can cause multiple issues, one of them being moisture. Dampness is the major cause of a damaged foundation. If you notice any plumbing issues, consider getting immediate help from a plumber.

6.    Check Exterior Foundation

While moving outside a residence towards an exterior foundation, make sure to check the chimneys and patios for any possible shifting or movement. A chimney is more prone to get separated from a building because of a weak foundation. You can rapidly determine these spaces from just a quick glance.

Why Get a WTX Foundation Repair

A yearly inspection is a good way to prevention of irreversible foundation damage. If any of the above mentioned problems are found during a DIY inspection, they should be immediately evaluated by a professional.

With an extensive experience of about 20 years, WTX is offering concrete house leveling, superior foundation, and also waterproofing services in Eastern New Mexico and West Texas. Give us a quick phone call to schedule a free foundation inspection and quick consultation for a house foundation inspection.

How Does Temperature Affect Mold Growth?

Did you know that mold development can be influenced by the temperature in your house or place of business? How does the temperature impact the development of mould? Mould development is encouraged by many different causes. These include primarily temperature, organic materials, and moisture.

The ideal temperature for mold growth in your house or business is a less well-known factor. Based on how low or high the temperature is, mould development might be aided or hindered. Increased temperatures can promote the formation of mould, particularly on food products or damp surfaces, as high temperatures can produce owing to condensation.

Most individuals are aware that mould may grow in areas with too much moisture. Typically, indoor temperatures are managed between 60 to 80 degrees Fahrenheit. Unfortunately, many different forms of mould flourish in this temperature. While lowering the likelihood of mould formation, you may maintain a pleasant temperature for mould growth in your house or place of business.

Through this blog, we want to ensure that you possess the knowledge necessary to choose the mould removal method that is ideal for you.

Mould: How Does It Grow?

Several variables can contribute to the formation of mould. It thrives in conditions with warmth, moisture, oxygen, and a surface for the growth of mould spores. To do your best to avoid those situations, it is essential to be aware of the circumstances where mould might thrive.

How Does Mold Look Like?

Although it’s alluring to label any spore or gross growth in your house as “mould,” doing so might be challenging. Mould may appear everywhere that moisture exists, but it usually grows in damp places like your bathroom or basement or at the source of a water leak.

Mould typically starts off looking like fuzzy white specks before changing to green, blue, grey, orange, or black over time. At first, you might even confuse the spots for stains, but if they deepen and begin to smell musty, you’re probably dealing with mould. Another word for mould is “mildew,” which you may have also heard. It often appears as dry white, yellow, or grey patches.

The good news is that both issues may be resolved similarly by preventing moisture build-up and cleaning the area using a cleaner suitable for the surface in question and also the ideal temperature for mold growth.

How Much Heat Does Mold Require to Grow?

In addition to oxygen and water, mould also needs a food supply and an appropriate temperature for mould growth. Mould spores can go into a latent resting state even in the absence of optimum circumstances and wait for conditions to improve. This is why many refrigerators have the temperature set at 39 degrees.

In particular, when there is a lot of humidity in the air, a temperature range of 77 to 86 degrees Fahrenheit is optimal for mould growth. For mould spores to be properly killed, temperatures must either drop below zero or rise over one hundred degrees, the most favourable temperature for mold growth.

5 Signs That You Might Need Mold Remediation Services

Professional mould treatment goes beyond simple cleaning. Removing the cause of the fungal development, which is frequently too much moisture or moist circumstances, is the first step in this complicated procedure.

On moist, porous surfaces, mould can appear within 1-2 days, thus prevention is essential. When possible, the remediation procedure uses cutting-edge techniques to clear out all mildew and return your home or structure to its pre-damage state.

Existence of Water Damage

If specific areas of the home experience water damage and are subsequently left unattended, mould colonies will prevail. When your home has recently experienced flooding due to a storm, this frequently occurs. With a checklist in hand, you should walk through your house noting any locations where you have noticed water damage. This will be useful when the time comes for you to do your mould clean-up on those mould colonies.

Visible Mould Development & Ideal Mold Growth Temperature

Visual appearance on the ceilings, walls, or floors is the most evident indication that you have a mould problem. It’s critical to act right away if you observe a certain temperature for mould growth since, if unchecked, it will only spread. A qualified expert should only be used to remove some forms of mould since others can be highly harmful. When we discuss the ideal mold growth temperature, a humid environment is the best place for mold development and growth.

A Home Inspector Reported Mold

A home inspector will probably visually search the inside and outside of your house to look for symptoms of mould if you’re buying or selling a house. They frequently look closely at places that appear to be concealed to find mould risks like leaks and areas where moisture collects. Because mould may develop covertly, it can surprise you if an inspector finds it.

To preserve structural integrity and safeguard the health of the new homeowners, a mould remediation service can get rid of this possible risk from your house.

You Notice Musty Odours

When you begin to detect mildew-like odours, especially in spaces that frequently contain dampness, mould treatment will be required. Check carefully temperature for mould growth because the infestation might not be on a specific surface but might lurk beneath walls, in wooden structures, or even in your HVAC system.

People Are Getting Sick in Your Home

Be aware of any illnesses that household members may be suffering from. When breathed in, mould spores can lead to respiratory issues and watery eyes. If you or anybody else in your home has asthma, pay close notice since if your mould problem is severe enough, these problems will often get worse.